We love a game night at our house! It has become a family tradition to gather around the table and break out a board game for some quality family time. Today on Happiest Camper, I’m going to show you How To Make A Dice Bag. I got the inspiration for this little project at our last family game night. When we were done and trying to put everything away neatly, I noticed several of the dice and smaller game pieces were just laying free in the box. I knew it would be super easy to whip something up to keep them all together, so I did and it turned out great. This little bag is perfect for all kinds of things, not just dice. We used it to store the dice and game pieces from our Millennial Edition Monopoly game and it keeps everything nice and secure. This sewing project is super simple and easy to sew making it a great project for beginners and anyone wanting to get into sewing. I made small projects like this when I was just starting out and I still use some of them today. This bag is also great for smaller toys as well.

For this project, I picked out some camo print cotton fabric I had in my scrap pile from a previous project. You could use whatever fabric you wanted to make this, but I recommend picking some from your scrap stash so you could make this for basically nothing. You’ll need a small length of cordage to secure the top of the bag with and that’s it. Gather up your sewing supplies or restock if you need and let’s get started on this fun and simple sewing tutorial!


Start this how to make a dice bag sewing tutorial by cutting your fabric to the size needed. You will need a 7″x4″ piece. I generally like to wash, dry, and press my fabric before I start so that it is easier to cut, but I didn’t feel it was necessary with this project

Lay the fabric face down. Along the 4-inch side, fold it over on one end by 1/4 inch and pin it in place. You only need to pin it so that it is about 1 inch long. Do the same on the other side.

Sew that fold down sewing close to the raw edge. Do both sides.
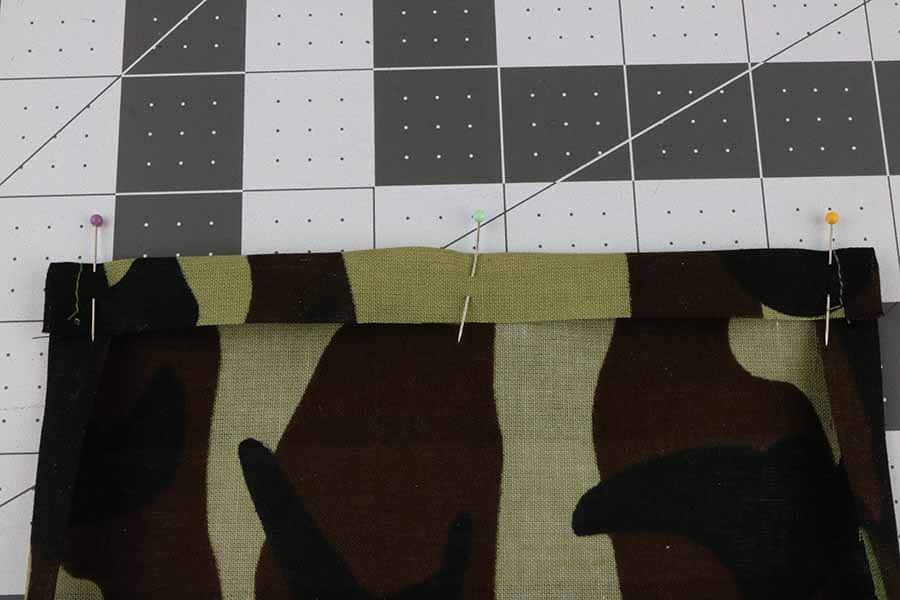
Now on this how to make a dice bag sewing tutorial, do the same thing on the 7-inch side at that same end. Fold it over by about half an inch all the way across and pin it in place.

Sew that fold all the way across close to the raw edge just like you did before.

Next, fold the fabric in half along that stitched area so that the right sides are touching each other. Pin along the side and bottom edges to hold everything in place. We are about halfway through this how to sew a dice bag sewing tutorial!

Head back over to the sewing machine and sew down the side starting at the stitching of that cross stitch. You don’t want to sew those open ends closed where you stitched.

When you get to the bottom, turn the corner and sew across the bottom as well. Be sure to do a backstitch at the start and fish.

Turn the pouch right side out. You can use the eraser end of a pencil or a turning tool to help you push out the corners.

Next on this how to make a dice bag, we will work on the drawstring opening. Feed the cord through the opening around the top.
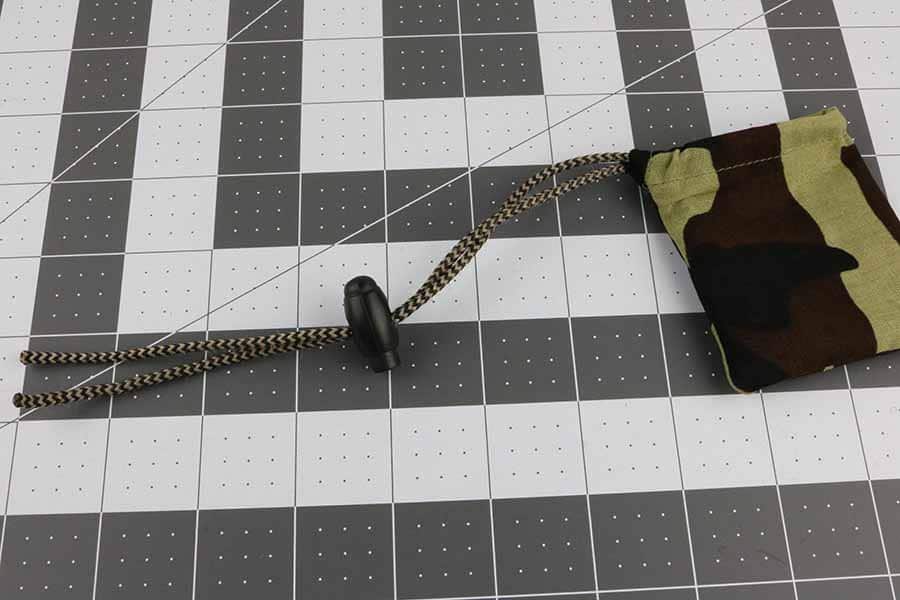
Run both ends of the cord through the toggle so you can secure the closure.

Then knot the ends of the cord together and you are done!

Now you know how to make a dice bag! This fun little bag is perfect for keeping up with dice for your favorite board games like Yahtzee, shut the box, or even monopoly. If you don’t need to keep up with dice, this bag works great for marbles, jacks, or you could even use it for your child so they can keep up with their favorite toys. My kids keep toy soldiers in theirs. My husband keeps some of his hunting stuff in the one I made for him. Whatever you decide to use it for, this little bag works great!

If you liked learning how to make a dice bag, make sure to pin it to your favorite Pinterest board or share it with friends on social media. If you decide to make this simple project on your own, make certain that you take a picture afterward and tag us on social media as we love seeing the fabrics and color choices that people use!
Yield: 1

Print
Keep up with your small game pieces with this easy sew dice bag! Fun and simple sewing tutorial that even a beginner can sew. Easy Dice bag.
Active Time 10 minutes
Total Time 10 minutes
Difficulty Easy
Estimated Cost $1.50
As an Amazon Associate and member of other affiliate programs, I earn from qualifying purchases.
Project Type: Sewing / Category: DIY/Sewing
The post How To Make A Dice Bag appeared first on Happiest Camper.
For this project, I picked out some camo print cotton fabric I had in my scrap pile from a previous project. You could use whatever fabric you wanted to make this, but I recommend picking some from your scrap stash so you could make this for basically nothing. You’ll need a small length of cordage to secure the top of the bag with and that’s it. Gather up your sewing supplies or restock if you need and let’s get started on this fun and simple sewing tutorial!
What You’ll Need:
- 7″ x 4″ Piece Of Fabric
- Thread (match color of the fabric)
- 22″ Small Paracord (ends singed to stop the fray)
- 1 Cord Toggle Stopper
- Scissors
- Iron
- Pins
- Optional Rotary Cutter & Mat
- Measuring tape
- Thread nippers
- Sewing machine
How To Make A Dice Bag
Start this how to make a dice bag sewing tutorial by cutting your fabric to the size needed. You will need a 7″x4″ piece. I generally like to wash, dry, and press my fabric before I start so that it is easier to cut, but I didn’t feel it was necessary with this project
Lay the fabric face down. Along the 4-inch side, fold it over on one end by 1/4 inch and pin it in place. You only need to pin it so that it is about 1 inch long. Do the same on the other side.
Sew that fold down sewing close to the raw edge. Do both sides.
Now on this how to make a dice bag sewing tutorial, do the same thing on the 7-inch side at that same end. Fold it over by about half an inch all the way across and pin it in place.
Sew that fold all the way across close to the raw edge just like you did before.
Next, fold the fabric in half along that stitched area so that the right sides are touching each other. Pin along the side and bottom edges to hold everything in place. We are about halfway through this how to sew a dice bag sewing tutorial!
Head back over to the sewing machine and sew down the side starting at the stitching of that cross stitch. You don’t want to sew those open ends closed where you stitched.
When you get to the bottom, turn the corner and sew across the bottom as well. Be sure to do a backstitch at the start and fish.
Turn the pouch right side out. You can use the eraser end of a pencil or a turning tool to help you push out the corners.
Next on this how to make a dice bag, we will work on the drawstring opening. Feed the cord through the opening around the top.
Run both ends of the cord through the toggle so you can secure the closure.
Then knot the ends of the cord together and you are done!
Now you know how to make a dice bag! This fun little bag is perfect for keeping up with dice for your favorite board games like Yahtzee, shut the box, or even monopoly. If you don’t need to keep up with dice, this bag works great for marbles, jacks, or you could even use it for your child so they can keep up with their favorite toys. My kids keep toy soldiers in theirs. My husband keeps some of his hunting stuff in the one I made for him. Whatever you decide to use it for, this little bag works great!
If you liked learning how to make a dice bag, make sure to pin it to your favorite Pinterest board or share it with friends on social media. If you decide to make this simple project on your own, make certain that you take a picture afterward and tag us on social media as we love seeing the fabrics and color choices that people use!
Yield: 1
Simple Sew Dice bag
Keep up with your small game pieces with this easy sew dice bag! Fun and simple sewing tutorial that even a beginner can sew. Easy Dice bag.
Active Time 10 minutes
Total Time 10 minutes
Difficulty Easy
Estimated Cost $1.50
Materials
- 7″ x 4″ Piece Of Fabric
- Thread (match color of the fabric)
- 22″ Small Paracord (ends singed to stop the fray)
- 1 Cord Toggle Stopper
Tools
Instructions
- Cut fabric to the size needed. You will need a 7"x4" piece.
- Lay the fabric face down. Along the 4-inch side folded it over on one end by 1/4 inch and pin in place. You only need to pin it so that it is about 1 inch long. Do the same on the other side.
- Sew that fold down sewing close to the raw edge. Do both sides.
- Now on the 7-inch side at that same end, fold it over by about half an inch all the way across and pin it in place.
- Sew that fold all the way across close to the raw edge.
- Now fold the fabric in half along that stitched area so the right sides are touching each other. Pin along the side and bottom edges.
- Sew down the side starting at the stitching of that cross stitch. You don't want to sew those open ends closed where you stitched. When you get to the bottom, turn the corner and sew across the bottom as well. Be sure to do a backstitch at the start and fish.
- Turn the pouch right side out.
- Feed the cord through the opening around the top.
- Run both ends of the cord through the toggle.
- Then knot the ends of the cord together and you are done.
Recommended Products
As an Amazon Associate and member of other affiliate programs, I earn from qualifying purchases.

Best Beginner Sewing Machines
, Grey")
Fiskars Crafts 95237097J Rotary Sewing Cutting Set (3 Piece), Grey

4-Pack Turquoise All Purpose Sewing Thread
")
LIVINGO Premium Tailor Scissors Heavy Duty Multi-Purpose Titanium Coating Forged Stainless Steel Sewing Fabric Leather Dressmaking Softgrip Shears Professional Crafting (9.5 INCH)
Project Type: Sewing / Category: DIY/Sewing
More Fun Sewing Projects:
- DIY Corn Hole Bags
- How to Make Popsicle Sleeves for Freezer Pops
- Easy Sew Slouchy Tote Bag With Free Pattern
- How To Make A Scissor Pouch Tutorial
- DIY Crossbody Water Bottle Holder Sewing Tutorial
The post How To Make A Dice Bag appeared first on Happiest Camper.