This DIY Plastic Bag Dispenser is a simple sewing project and one that most people need! If you’re tired of having nowhere for your plastic bags to be in your home, it’s time to make your own. All you need is this simple sewing tutorial on how to sew a plastic bag dispenser to get started. You’ll be done before you realize it and have a lovely storage space for all your plastic bags.

I can’t tell you how many plastic bags we have in our house. And while I’m not crazy about that fact, I’m also not crazy about having them just lying around our house as well. They seem to multiply at a fast rate and drive me crazy in the process, too. This is why I really like this simple bag holder project. It’s simple and easy and it solves a problem that all homes tend to deal with. If you shop, you have plastic bags. Why not make your own place to store them with this easy sewing project?
This easy-sew plastic bag dispenser makes a great housewarming gift for new homeowners. It can even make a great Christmas gift you can sew because it is a simple yet practical sewing project that solves one of life’s problems of what to do with those plastic bags.

I always start by washing, drying, and ironing the fabric. As I’ve said many times, pre-washing allows the fabric to pre-shrink a little so that the first time you wash your project, your stitches don’t pull out.

Grab your cutter and tape measure or ruler and measure and cut a rectangle of fabric 18” x 22”. This is all you need to cut out for this project. So easy!
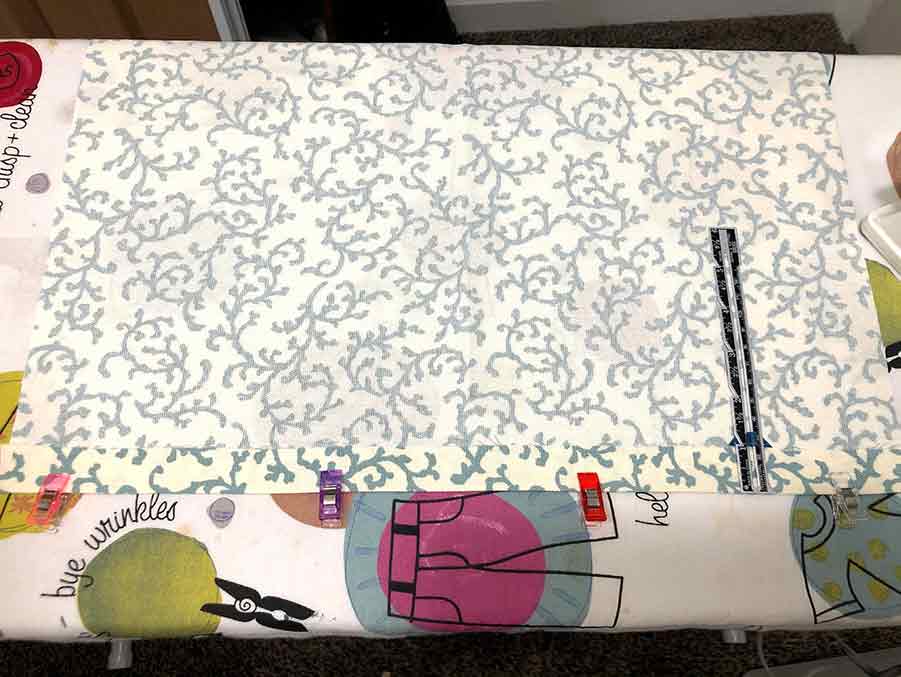
First, we need to sew a casing for the elastic end. On one shorter edge (18” side) of the fabric, fold the edge up to 1” and press as you go. Be sure it’s even all the way across! I used a hem gauge for this. Add a few clips or pins to hold in place.

Repeat for the opposite end of the fabric (the other 18” side).

Sew both clipped (or pinned) edges with 3/4” seam allowance.
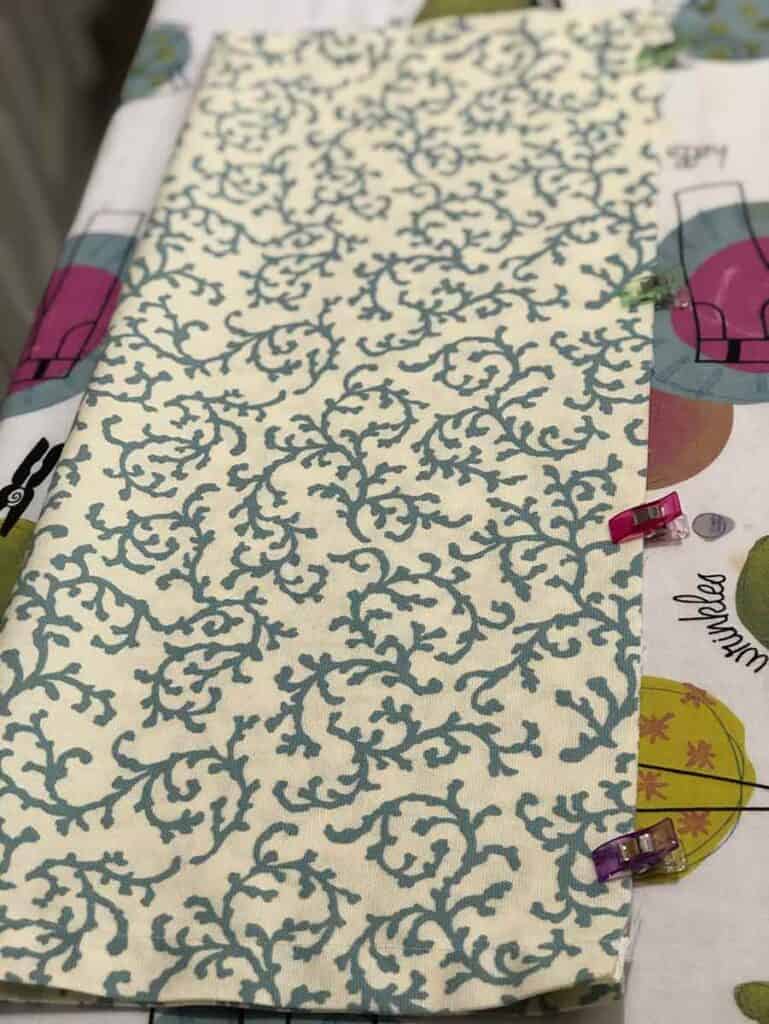
Now, we want to create a French seam to enclose the raw edges along the length of the bag. With the sewn edges at the top and the bottom, fold the wrong sides of the fabric together, ensuring the raw edges of the fabric are lined up. This will feel funny, but we’ll tuck in the raw edges in a minute.

Using ¼” seam allowance, stitch along the raw edge from the top to just before the bottom. STOP right at the stitch line for the casing!

Measure and cut an 8” strip of elastic. Insert a safety pin into one end of the elastic. You are about halfway through this DIY Plastic Bag Dispenser tutorial!

Insert the safety pin end inside the bottom casing of the fabric. Working it through the casing, gently pull the elastic along. When the other end of the elastic reaches the opening, pin it to the fabric with a straight pin to hold it in place ONLY on that side of the fabric casing.

Continue to work the pinned end of the elastic through the casing until it comes out of the opening on the other side. Re-pin the elastic, making sure to catch both ends of the fabric loop you have created. Your casing fabric will be very “bunchy” at this point. You may want to push the bunched-up parts away from the elastic ends to avoid bulk while sewing. You are getting close to finishing your plastic bag dispenser.

With ¼” seam allowance, continue from your previously sewn line (along the raw edge) to finish sewing across the casing and both pieces of elastic. Backstitch several times to reinforce elastic seam.

Reach inside the tube and grab the opposite end of the fabric. Pull the fabric tube inside out.

Using a chopstick or turning tool, push out the fabric right along the seam line on the length of the bag. Then press with your iron to make a flat crease. Pin or clip along the seam if desired.

Using ½” seam allowance, stitch along the length of the bag again. This will encase the raw edges in a French seam. You’ll sew over both the top hem and the bottom elastic hem. Backstitch at the beginning and end of your seam. Flip the bag back to right side out.

With your 7” strip of ribbon, create a loop and position it on the inside of the bag holder. I put mine right next to the seam in the back. Pin to hold securely while you stitch.

You’ll want to stitch two lines – one along the top edge of the bag, and one on the lower edge of the ribbon (see photo). This will ensure the ribbon doesn’t pull off. Backstitch several times to create a strong hold.

Now just fill your DIY Plastic Bag Dispenser with plastic bags and admire your handiwork!
I preferred the thicker home décor fabric to have more shape to my bag. However, you could use other fabrics as well. In fact, fat quarters are the perfect measurements, so you wouldn’t have to cut your fabric. Just don’t wash the fat quarter first to eliminate any fraying (this will change the dimensions).

If you liked this easy DIY plastic bag dispenser, make sure to pin it to your favorite Pinterest board or share it with friends on social media. If you decide to make this simple project on your own, make certain that you take a picture afterward and tag us on social media as we love seeing the fabrics and color choices that people use!

Print
This DIY Plastic Bag Dispenser is a great addition to any kitchen. If you're like me, you have a million plastics bags everywhere and no place to put them. This simple sewing project gives you an easy solution to the chaos!
Prep Time 5 minutes
Active Time 15 minutes
Total Time 20 minutes
Difficulty Easy
Estimated Cost $5.00
I preferred the thicker home décor fabric to have more shape to my bag. However, you could use other fabrics as well. In fact, fat quarters are the perfect measurements, so you wouldn’t have to cut your fabric. Just don’t wash the fat quarter first to eliminate any fraying (this will change the dimensions).
As an Amazon Associate and member of other affiliate programs, I earn from qualifying purchases.
Project Type: Sewing / Category: DIY/Sewing
The post DIY Plastic Bag Dispenser appeared first on Happiest Camper.
I can’t tell you how many plastic bags we have in our house. And while I’m not crazy about that fact, I’m also not crazy about having them just lying around our house as well. They seem to multiply at a fast rate and drive me crazy in the process, too. This is why I really like this simple bag holder project. It’s simple and easy and it solves a problem that all homes tend to deal with. If you shop, you have plastic bags. Why not make your own place to store them with this easy sewing project?
What You’ll Need For This DIY Plastic Bag Dispenser
- Fabric (Heavier home décor type fabric works well! You’ll need just over ½ yard)
- 7” strip of ribbon (width of your choice, I used ¾”)
- Thread
- 1/2” elastic (it’s a good idea to make sure the color you choose matches with your fabric if possible – i.e., don’t use black elastic inside white fabric!)
- Scissors
- Optional: Rotary cutter and mat
- Optional: Hem gauge
- Pins or clips
- Safety pin
- Iron/ironing board·
- Sewing machine
This easy-sew plastic bag dispenser makes a great housewarming gift for new homeowners. It can even make a great Christmas gift you can sew because it is a simple yet practical sewing project that solves one of life’s problems of what to do with those plastic bags.
How To Make A DIY Plastic Bag Dispenser
I always start by washing, drying, and ironing the fabric. As I’ve said many times, pre-washing allows the fabric to pre-shrink a little so that the first time you wash your project, your stitches don’t pull out.
Grab your cutter and tape measure or ruler and measure and cut a rectangle of fabric 18” x 22”. This is all you need to cut out for this project. So easy!
First, we need to sew a casing for the elastic end. On one shorter edge (18” side) of the fabric, fold the edge up to 1” and press as you go. Be sure it’s even all the way across! I used a hem gauge for this. Add a few clips or pins to hold in place.
Repeat for the opposite end of the fabric (the other 18” side).
Sew both clipped (or pinned) edges with 3/4” seam allowance.
Now, we want to create a French seam to enclose the raw edges along the length of the bag. With the sewn edges at the top and the bottom, fold the wrong sides of the fabric together, ensuring the raw edges of the fabric are lined up. This will feel funny, but we’ll tuck in the raw edges in a minute.
Using ¼” seam allowance, stitch along the raw edge from the top to just before the bottom. STOP right at the stitch line for the casing!
Measure and cut an 8” strip of elastic. Insert a safety pin into one end of the elastic. You are about halfway through this DIY Plastic Bag Dispenser tutorial!
Insert the safety pin end inside the bottom casing of the fabric. Working it through the casing, gently pull the elastic along. When the other end of the elastic reaches the opening, pin it to the fabric with a straight pin to hold it in place ONLY on that side of the fabric casing.
Continue to work the pinned end of the elastic through the casing until it comes out of the opening on the other side. Re-pin the elastic, making sure to catch both ends of the fabric loop you have created. Your casing fabric will be very “bunchy” at this point. You may want to push the bunched-up parts away from the elastic ends to avoid bulk while sewing. You are getting close to finishing your plastic bag dispenser.
With ¼” seam allowance, continue from your previously sewn line (along the raw edge) to finish sewing across the casing and both pieces of elastic. Backstitch several times to reinforce elastic seam.
Reach inside the tube and grab the opposite end of the fabric. Pull the fabric tube inside out.
Using a chopstick or turning tool, push out the fabric right along the seam line on the length of the bag. Then press with your iron to make a flat crease. Pin or clip along the seam if desired.
Using ½” seam allowance, stitch along the length of the bag again. This will encase the raw edges in a French seam. You’ll sew over both the top hem and the bottom elastic hem. Backstitch at the beginning and end of your seam. Flip the bag back to right side out.
With your 7” strip of ribbon, create a loop and position it on the inside of the bag holder. I put mine right next to the seam in the back. Pin to hold securely while you stitch.
You’ll want to stitch two lines – one along the top edge of the bag, and one on the lower edge of the ribbon (see photo). This will ensure the ribbon doesn’t pull off. Backstitch several times to create a strong hold.
Now just fill your DIY Plastic Bag Dispenser with plastic bags and admire your handiwork!
I preferred the thicker home décor fabric to have more shape to my bag. However, you could use other fabrics as well. In fact, fat quarters are the perfect measurements, so you wouldn’t have to cut your fabric. Just don’t wash the fat quarter first to eliminate any fraying (this will change the dimensions).
If you liked this easy DIY plastic bag dispenser, make sure to pin it to your favorite Pinterest board or share it with friends on social media. If you decide to make this simple project on your own, make certain that you take a picture afterward and tag us on social media as we love seeing the fabrics and color choices that people use!
DIY Plastic Bag Dispenser
This DIY Plastic Bag Dispenser is a great addition to any kitchen. If you're like me, you have a million plastics bags everywhere and no place to put them. This simple sewing project gives you an easy solution to the chaos!
Prep Time 5 minutes
Active Time 15 minutes
Total Time 20 minutes
Difficulty Easy
Estimated Cost $5.00
Materials
- Fabric (Heavier home décor type fabric works well! You’ll need just over ½ yard)
- 7” strip of ribbon (width of your choice, I used ¾”)
- Thread
- 1/2” elastic (it’s a good idea to make sure the color you choose matches with your fabric if possible - i.e., don’t use black elastic inside white fabric!)
Tools
- Scissors
- Optional: Rotary cutter and mat
- Pins
- Or Clips
- Safety pin
- Iron/ironing board
- Sewing machine
Instructions
- Measure and cut a rectangle of fabric 18” x 22”.
- On one shorter edge (18” side) of the fabric, fold the edge up to 1” and press as you go.
- Pin a few times to hold.
- Repeat for the opposite end of the fabric (the other 18” side).
Sew both pinned edges with 3/4” seam allowance. - With the sewn edges at the top and the bottom, fold the wrong sides of the fabric together, ensuring the raw edges of the fabric are lined up.
- Using ¼” seam allowance, stitch along the raw edge from the top to just before the bottom. STOP right at the stitch line for the casing!
- Measure and cut an 8” strip of elastic. Insert a safety pin into one end of the elastic.
- Insert the safety pin end inside the bottom casing of the fabric.
- Working it through the casing, gently pull the elastic along.
- When the other end of the elastic reaches the opening, pin it to the fabric with a straight pin to hold it in place ONLY on that side of the fabric casing.
- Continue to work the pinned end of the elastic through the casing until it comes out of the opening on the other side.
- Re-pin the elastic, making sure to catch both ends of the fabric loop you have created.
- With ¼” seam allowance, continue from your previously sewn line (along the raw edge) to finish sewing across the casing and both pieces of elastic.
- Backstitch several times to reinforce elastic seam.
- Reach inside the tube and grab the opposite end of the fabric. Pull the fabric tube inside out.
- Using a chopstick or turning tool, push out the fabric right along the seam line on the length of the bag.
- Then press with your iron to make a flat crease. Pin or clip along the seam if desired.
- Using ½” seam allowance, stitch along the length of the bag again. Backstitch at the beginning and end of your seam.
- Flip the bag back to right side out.
- With your 7” strip of ribbon, create a loop and position it on the inside of the bag holder.
- Pin to hold securely while you stitch.
- You’ll want to stitch two lines – one along the top edge of the bag, and one on the lower edge of the ribbon (see photo). Backstitch several times to create a strong hold.
- Fill your bag holder with plastic bags and admire your handiwork!
Notes
I preferred the thicker home décor fabric to have more shape to my bag. However, you could use other fabrics as well. In fact, fat quarters are the perfect measurements, so you wouldn’t have to cut your fabric. Just don’t wash the fat quarter first to eliminate any fraying (this will change the dimensions).
Recommended Products
As an Amazon Associate and member of other affiliate programs, I earn from qualifying purchases.
, Grey")
Fiskars Crafts 95237097J Rotary Sewing Cutting Set (3 Piece), Grey

4-Pack Turquoise All Purpose Sewing Thread

Clover 3183 50-Piece Wonder Clips, Assorted Colors

Best Beginner Sewing Machines
")
LIVINGO Premium Tailor Scissors Heavy Duty Multi-Purpose Titanium Coating Forged Stainless Steel Sewing Fabric Leather Dressmaking Softgrip Shears Professional Crafting (9.5 INCH)
Project Type: Sewing / Category: DIY/Sewing
More Simple Sewing Projects
- Easy To Make DIY Reusable Snack Bag
- How To Sew A Skirt With Elastic Waistband For Girls
- Sew Kitchen Hot pads
- Easy Sew Hanging Kitchen Towel
- How To Make A Reusable Bread Bag Tutorial
- Ladder Stitch Tutorial
The post DIY Plastic Bag Dispenser appeared first on Happiest Camper.